
We have been locked in the house for almost three weeks now, the motivation is globally known so I will not explain it here …
+++Trovate la versione in italiano sotto+++
During these 21 days I went from anxiety to sadness through a depressing apathy, but slowly I came out of it. Deciding not to watch television was the first of many smart choices. It is not that we do not inform ourselves, we do it but through a few official and verified sources in order to avoid unnecessary overloads. In short, no TV, a lot of chamomile, a pushing husband, Rusty and many things to do, slowly have awakened me.
So, after a few days of meditating whether to write or not, here I am. I decided to share some ideas of easy activities which can help to pass the time in a satisfying to those who perhaps begin to feel the weight of this time.
I thank every day for being in the new house and for having a garden where I can walk, breath and make some outside activities I dare not imagine how narrow an apartment might seem in this period.
But let’s think about other things, let’s start with the first 5 projects. We will sew, than move on to painting and coating of furniture and we end up with a mixed sewing-painting. I hope they can be the starting point for a “light” day.
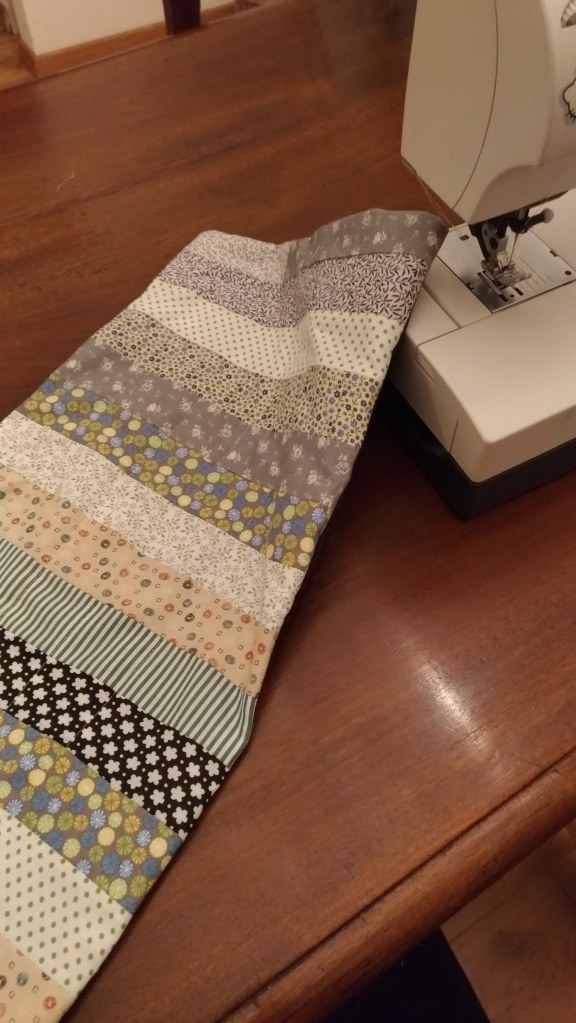
1. Spring Runner
It has been a while since I was posting a sewing project, it is because I have not actually “created” something with fabric and sewing machine and I missed it!
Well, this is an easy easy project that starts and ends in a day. It is a multicolor runner, I did it for the entrance shoe rack but if you change the sizes you can place it anywhere. There is also a super nice carpet for the children’s room or for a furry friend. 🐶🐺🦊
You need:
- Fabric strips, I have cut them all of the same width but you can choose differently. The only thing to remember is that you need them in the same height, the one your runner will have. You will therefore have to cut or sew several pieces together to get the same height for all the strips. Then decide the final length of your runner and divide it by the width of the single strip to have the number of pieces you will need (add 1cm of seam for each strip).
- Thin padding, the one for quilts is perfect but the one used for bibs or a heavy cotton fabric that gives consistency is also fine.
- Solid color cotton for the back.
- Classic sewing kit
Once you have cut out all the necessary strips, try to place them side by side. You can create games of color, going from light to dark, alternating patterns and solid colors or opt for a random sequence ..
Then start sewing them together on the long side. Once finished, apply the intermediate layer and then the base. Sew upside down along the edge leaving an opening to turn up. Reverse the job, close the opening and quilt your runner.
I don’t know how to quilt properly so I made some fancy seams with a white thread to hold the three layers in place.


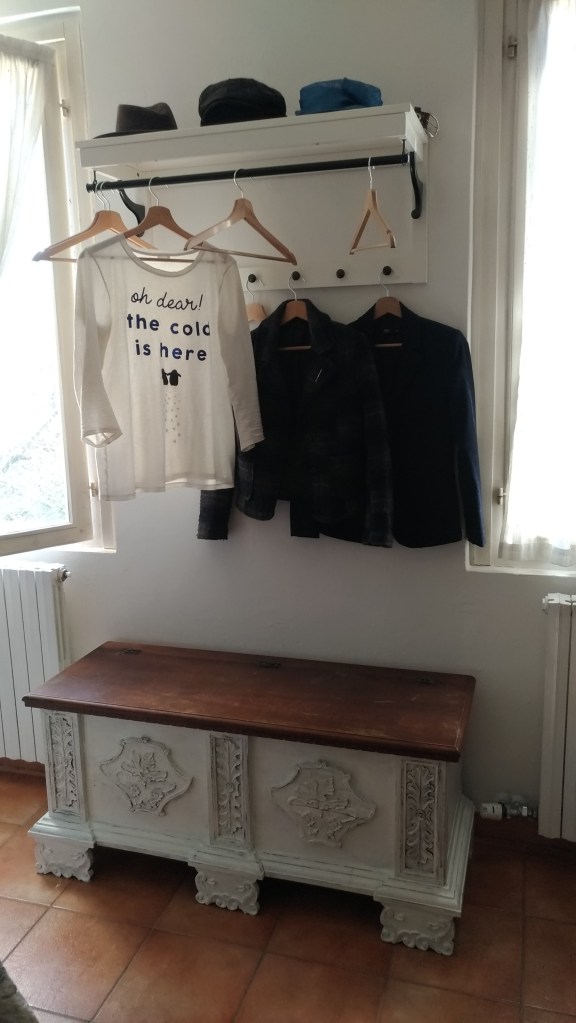
2. Shabby Chest
When we moved into the house there were some furniture of the old owners, some very nice things, such as the piano in the living room, others not so nice but still comfortable, such as the chest of the bedroom.
So, after months of thinking I decided to paint it. I asked the paint factory for a water-based enamel in the same color as the room walls. Then:
- I sanded and degreased the surface of the chest.
- I gave a first layer of enamel and, once dry, a second one. I was not particularly careful about painting because I wanted to give the furniture a shabby effect.
- Once the paint dried, I went back to scratching the surface where I wanted to bring out the original brown color.
I would say that for an afternoon job I feel satisfied. I didn’t paint the top of the chest because I like the contrast. What do you think?

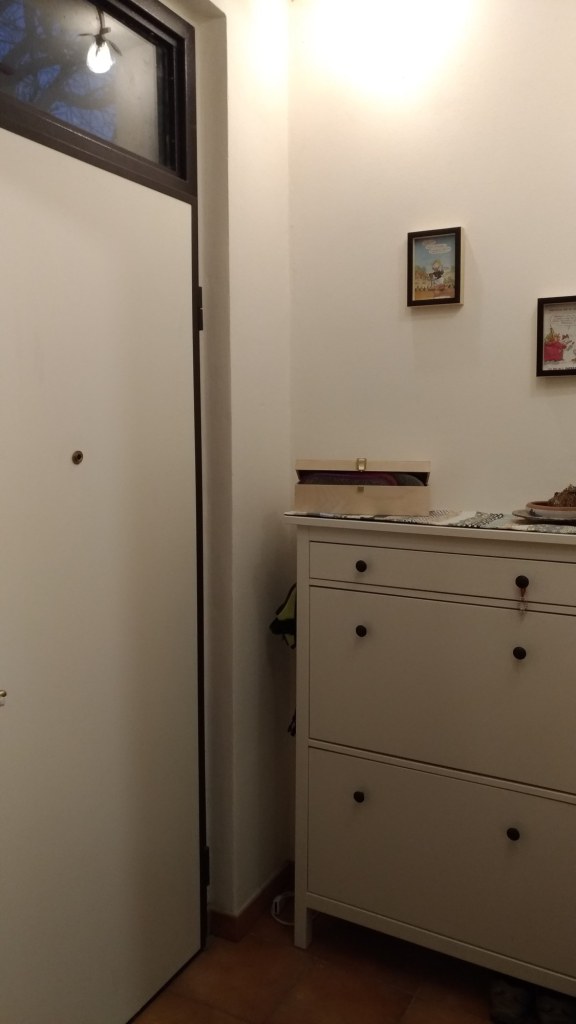
3. The Front Door
Taken from the sacred fire of water enamel 🙂 after a few days from the chest I decided to face the inside of the front door. Our internal panel was a brown faux wood which I found really ugly and it seemed to make, the already limited space of the entrance, even more tiny.
Taking advantage of a sunny day, we then removed the panel, sanded the surface and painted with a roller with 3 coats of water-based enamel.
Now I just have to find a nice frame to put around the peephole (like the one in “Friends” to be clear) and then .. Done! It is incredible what a nice coat of color can do.
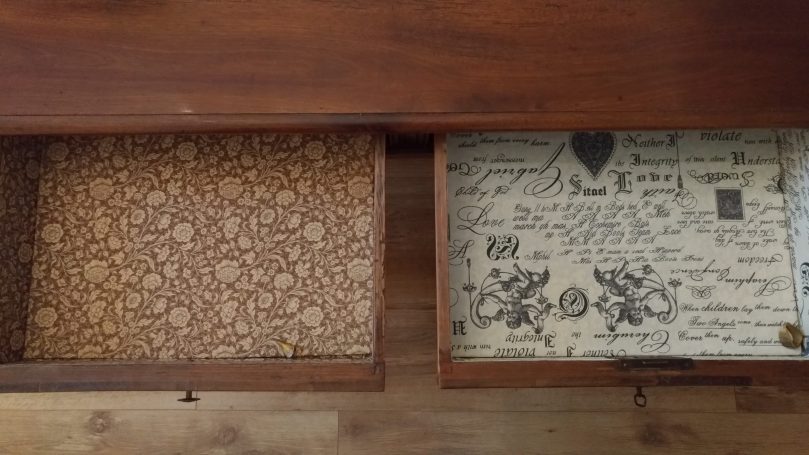
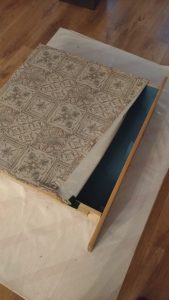
4. Table drawers
Another quick but often delayed job is the internal lining of the drawers. The ones on our dining table were covered with a sad floral paper that had worn out in the long run. I chose to replace the paper with a resin-coated cotton (I know I could almost have avoided writing it .. I covered practically anything with this type of fabric .. An example on all the cupboard 🙂 ).
This is the type of fabric used for tablecloths, especially those for outdoors, it is practical because it can be washed, it can be easily glued with vinavil diluted with water and the patterns are beautiful. So:
- We clean the drawers from the old paper. If it does not come off dry, wet the surface with warm water with the help of a sponge, let the water work and you will see that the paper will come off easily.
- Clean the inside of the drawers and take the measurements for the fabric (the bottom and a strip that covers the inside edge)
- Prepare a mixture of vinyl glue and water, dilute the glue so that it spreads more easily.
- Glue the fabric on the inside of the drawer. Another advantage of the resined cottons is that they do not fray so you can cut the edges flush without having to bead. Practical isn’t it?
If you prefer instead of fixing the fabric to the bottom of the drawer, you can prepare a removable bottom (rigid cardboard or other thin but rigid material), cover it and insert it in the drawer.


5. Bed drawers
The base of our bed is a ‘do it yourself’ of a few years ago. In the old house we didn’t have a room furnished so instead of buying a bed we thought of doing it. Wood, Ikea slat system and in a couple of evenings the husband put up a bed base with very comfortable and super-large drawers. Obviously the bed followed us also in the new house where it was enriched with an iron headboard left by the old owners.
Now, the drawers under the bed are very comfortable but they remain open towards the slats so I found hair (Rusty runs around the house freely) and dust almost everywhere. Not a pleasant thing …
I therefore decided to close the drawers with a layer of fabric, light, it does not create thickness, it can be fixed with Velcro and it is very easy to remove and wash.
Again, very few steps:
- Before fixing the new covers I cleaned the drawers and painted them with a super natural water paint to give some color
- Taking the size of the drawers, I cut the fabric. You can choose to turn the edges up and fix them with a seam or finish them with a zigzag or with the overlook machine.
- Then fix the soft part of the velcro on the lower edges. While you will fix the stiffer one to the wood with glue and some staples to make it hold well. To save Velcro you can fix it only in some places instead of doing the whole contour.
Beautiful colored and functional. What more could you want?
In a few days I hope to be able to publish a list of 5 other projects to do with children or to make children do. Although I believe that they, more than us, know how to find a new way to face the day.

+++ ITA Version +++
Ormai sono tre settimane che siamo chiusi in casa, la motivazione è globalmente nota quindi non la starò a spiegare qui…
Durante questi 21 giorni sono andata dall’ansia alla tristezza passando per un’apatia deprimente, piano piano però ne sono uscita. Decidere di non guardare più la televisione è stata la prima di molte scelte intelligenti. Non è che non ci informiamo, lo facciamo ma attraverso poche fonti ufficiali e verificate in modo da evitare sovraccarichi inutili. Insomma, niente TV, tanta camomilla, un marito sprone, Rusty e tante cose da fare lentamente mi hanno risvegliata.
Così, dopo qualche giorno a meditare se scrivere o no, eccomi qui.
Ho deciso di raccogliere alcuni spunti di attività facili ma dalle grandi soddisfazioni, che possano aiutare a distogliere l’attenzione e a far passare il tempo a chi magari inizia a sentire il peso della clausura.
Io ringrazio ogni giorno di essere nella casa nuova e di avere un giardino dove poter passeggiare, non oso immaginare quanto stretto possa sembrare un appartamento in questo periodo.
Ma pensiamo ad altro, iniziamo con 5 progetti. Partiamo dal cucito, passiamo alla pittura poi al rivestimento di mobili e finiamo con un misto cucito-pittura. Spero possano essere lo spunto per una giornata “leggera”.
1. Spring Runner
E’ passato qualche tempo dall’ultimo progetto di cucito di cui ho parlato, sarà che effettivamente è un po’ che non ‘creo’ con stoffa e macchina da cucire.. Mi mancava!
Bhe, questo è un progetto facile facile che si inizia e finisce in una giornata. Si tratta di un runner multicolore, io l’ho fatto per la scarpiera dell’ingresso ma basta cambiare le misure e lo si puo’ posizionare ovunque. Ci viene anche un super tappeto per la camera dei bimbi o per un quadrupede peloso 🐶🐺🦊
Vi servono:
- Strisce di stoffa, io per comodità le ho tagliate dello stesso spessore ma potete anche utilizzarle di spessori diversi (gli scarti dei vecchi progetti vanno benissimo). L’unica cosa che dovete fare è prepararle tutte della stessa altezza, quella che avrà il vostro runner. Dovrete quindi tagliare o cucire insieme più pezzi per arrivare ad avere la stessa altezza per tutte le strisce. Calcolate poi la lunghezza finale del vostro runner e dividetelo per la larghezza della singola striscia per avere il numero di pezzi che vi serviranno (aggiungete 1cm di cucitura per ogni striscia).
- Strato intermedio di imbottitura sottile, quello per le trapunte è perfetto ma va bene anche quello che si usa per i bavaglini o un tessuto di cotone pesante che dia consistenza.
- Cotone tinta unita per il retro.
- Kit di cucito classico
Una volta che avrete ritagliato tutte le strisce necessarie pensate a come volete affiancarle. Potete creare dei giochi di colore, passando dai chiari agli scuri, alternare fantasie e tinte unite o optare per una sequenza casuale..
Iniziate poi a cucirle le une alle altre sul lato lungo. Una volta finito posizionate il retro del tinta unita sul vostro runner (fronte della stoffa su fronte della stoffa) e poi l’imbottitura. Cucite quindi lungo tutto il bordo lasciando un’apertura per risvoltare.
Io non so trapuntare come si deve, mi sono limitata a fare delle cuciture fantasia con un filo bianco per tenere fermi i tre strati.
2. Cassapanca Shabby
Quando ci siamo trasferiti in casa erano rimasti alcuni mobili dei vecchi proprietari, alcune cose molto belle, come il pianoforte in salotto, altre non proprio di mio gusto ma comunque comode, come la cassapanca della camera.
Dopo mesi di ragionamenti e progetti ho deciso di pitturarla. Ho chiesto in colorificio uno smalto all’acqua dello stesso colore della finitura muraria, mi sono armata di cartavetrata, paglietta e solvente e via. Pochi semplici passi:
- Ho carteggiato e sgrassato la superficie da trattare. Solo una passata superficiale per dar modo alla vernice di aggrapparsi meglio.
- Ho dato un primo strato di smalto all’acqua ed una volta asciutto un secondo strato. Non sono stata particolarmente attenta alla verniciatura perché volevo dare un’effetto shabby al mobile e non smaltarlo perfettamente.
- Una volta asciugata la pittura sono tornata a grattare la superficie nei punti in cui volevo far riemergere il colore originario.
Direi che tutto sommato per essere il lavoro di un pomeriggio non è affatto male. Soprattutto è molto meno pesante rispetto a prima. Non ho smaltato la parte superiore della cassapanca perché mi piaceva il contrasto. Che dite 🤔?

3. Porta Blindata
Presa dal sacro fuoco dello smalto all’acqua 🤓 dopo qualche giorno dalla cassapanca ho deciso di affrontare l’interno della porta blindata.
Adesso devo solo trovare una bella cornice da mettere attorno allo spioncino (vi ricordate quella dell’appartamento di Monica in “Friends”? Mi è sempre piaciuta un sacco!) e poi.. Fatta! E’ incredibile quello che una bella mano di colore puo’ fare!!

4. Cassetti Tavolo
Altro lavoro veloce ma spesso rimandato è quello del rivestimento interno dei cassetti. Quelli del nostro tavolo da pranzo avevano una triste carta floreale che a lungo andare si era consumata. Ho scelto di andare a sostituire la carta con un cotone resinato (lo so avrei quasi potuto evitare di scriverlo.. Ho rivestito praticamente qualsiasi cosa con questo tipo di stoffa.. Un esempio su tutti l’armadio ).
Si tratta della stoffa usata per le tovaglie, soprattutto quelle da esterno, è pratica perché lavabile, si può incollare facilmente con del vinavil diluito con acqua e le fantasie sono bellissime, si trova veramente qualsiasi cosa. Quindi:
- Eliminiamo la vecchia carta dai cassetti. Se non si stacca da asciutta bagnate la superficie con acqua tiepida aiutandovi con una spugna, lasciate lavorare l’acqua e vedrete che la carta si staccherà facilmente.
- Pulite l’interno dei cassetti e prendete le misure per la stoffa (il fondo e una striscia che copra il bordo interno)
- Preparate una mistura di colla vinilica e acqua, diluite la colla in modo che si stenda più facilmente.
- Incollate la stoffa sull’interno del cassetto.
5. Cassetti Letto
La base del nostro letto è un fai da te di qualche anno fa. Nella vecchia casa in affitto non avevamo una camera arredata così anziché comprare un letto abbiamo pensato di farlo. Legno, sistema doghe Ikea e in un paio di sere il marito ha messo in piedi una base letto con cassetti comodissima e super capiente. Ovviamente il letto ci ha seguiti anche nella casa nuova dove si è arricchito di una testiera in ferro lasciata dai vecchi proprietari.
Ora, i cassetti sotto al letto sono comodissimi ma restano aperti verso le doghe così mi ritrovavo peli (Rusty scorrazza per casa liberamente) e polvere un po’ ovunque. Non una cosa piacevole…
Ho deciso quindi di chiudere i cassetti con uno strato di stoffa, leggero, non crea spessore, si puo’ fissare con il velcro ed è facilissimo da togliere e lavare.
Anche in questo caso, pochissimi passaggi:
- Prima di fissare le nuove coperture ho pulito i cassetti e li ho pitturati con una vernice all’acqua super naturale per dare un po’ di colore
- Presa la misura dei cassetti ho tagliato la stoffa. Potete scegliere se risvoltare i bordi e fissarli con una cucitura o rifinirli con uno zig-zag o con la taglia e cuci.
- Fissate poi sui bordi inferiori la parte morbida del velcro. Mentre fisserete quella più rigida al legno con la colla e alcuni punti metallici per far si che tenga bene. Per risparmiare velcro potete fissarlo solo in alcuni punti anziché fare tutto il contorno.
Belli colorati e funzionali. Cosa si puo’ volere di più?


Tra qualche giorno spero di riuscire a pubblicare un elenco di altri 5 progetti da fare con i bambini o da far fare ai bambini. Anche se credo che loro, più di noi, sappiano inventare ogni giorno un modo nuovo per affrontare la giornata 💛💙💜

[…] decorate a surface quickly and making sure it remains washable. I used the same technique for the table drawers and the dining room china […]
LikeLike