
Last Xmas I received this small, black, quite anonymous, e-reader. I really love books, paper books J but I have to admit that this small thing is great! So many stories in one place, so many books in my purse or in my bag for a trip. You can have with you all the writers you love, everywhere!
So, nice toy but still anonymous! It really needs an handmade cover! 🙂
+++ Trovate sotto la versione in italiano +++
What we need: Fabric (soft, washable), thin cotton padding, rubber band, pencil and paper, basic sewing kit.
Measure the e-reader
The first thing you need to do is measure your e-reader (my is 11cmx15cm, 1cm thick).
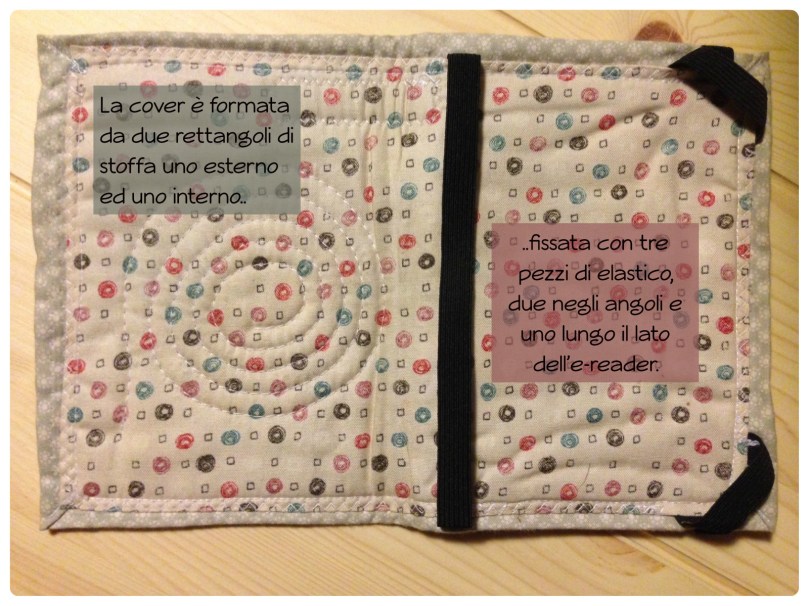
The cover is made of two fabric rectangles one for the inside and one for the outside.

The inside one is: twice the width of the e-reader plus once the thickness (11+11+1=23cm) for one side and the height of the e-reader for the other (15cm). Take this measures and add an extra 1cm for each side for the edge. In my case I have 25cmx17cm
The external one is: twice the width of the e-reader plus twice the thickness (11+11+1+1=24cm) for one side and the height of the e-reader plus twice the thickness for the other (15+1+1=17cm). Take this measures and add an extra 1cm for each side for the edge and another 1cm for the padding. In my case I have 28cmx21cm
Cut a rectangle from the padding of the same size of the external cover without edge so in my case 24cm x 17cm.
Fixing
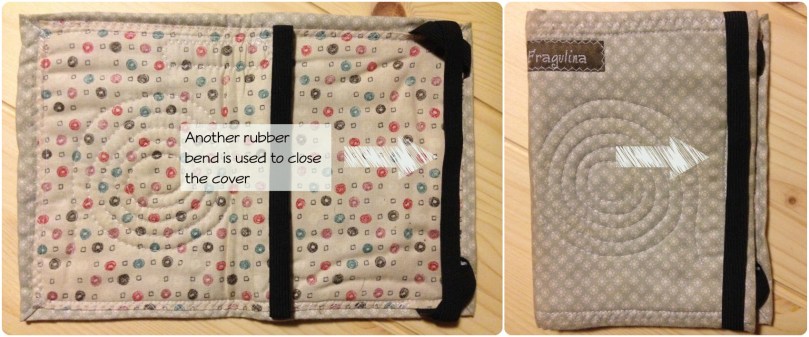
You have to imagine how fix the cover to the e-reader. My cover is simply fixed to the e-reader with three pieces of rubber bend, two on the corner and one on a side (see in picture). Another rubber bend is used to close the cover.
The length of the rubber bend is related to de dimensions of your e-reader I suggest to make some tests, for the corner make two rings of rubber bend.
Making
We will sew together the two rectangles putting in between the padding (like a sandwich) and fixing the four rubber bends with just one seam:
- Take the padding and fix it in the middle of the outside rectangle, fold the extra fabric in. Fix in place.
- Take the inside rectangle, fold the extra fabric and iron in place. You will need to see the inside rectangle finished.
- Put in place the rubber rings on the external corner of the cover and the rubber bend 1cm from the middle. Add the last bend, 1cm from the edge, over the corner ring. You will have this bend on the external side of the cover.
- Take the inside rectangle and put it in the middle of the cover, it has to pass trough the rubber bends fixing them.
- Sew on the inside rectangle making sure not to sew the external bend.
This is much more easy to do than to explain 🙂

+++ ITA – Version +++
Lo scorso Natale ho ricevuto in regalo un e-reader. Ora, io amo leggere per lo più libri di carta 🙂 adoro il fruscio dei fogli e il profumo dell’inchiostro, mi piace perdermi tra gli scaffali delle librerie e farmi consigliare nuovi autori mentre riscopro i classici.
Sarà per questo che inizialmente sono rimasta un po’ perplessa, ora però mi trovo a riconoscere che l’oggettino ha dei pregi non indifferenti: la sua memoria è tendente all’infinito, potete portare sempre con voi una serie completa dei vostri libri preferiti; è leggerissimo e super pratico, sta ovunque, dalla borsetta al borsone passando per lo zaino da montagna. Inoltre ha preinstallati una serie di dizionari che aiutano nella lettura in lingua. Insomma, niente male! Giusto un pochino anonimo.. Nulla che una bella cover personalizzata non possa risolvere 🙂
Cosa Ci serve: Stoffa (sceglietene una resistente e facilmente lavabile), imbottitura (non eccessivamente spessa), elastico, carta e matita, Kit da cucito.
Le Misure
Per prima cosa misurate il vostro e-reader (il mio è 11cmx15cm, spessore 1cm).
La cover è formata da due rettangoli di stoffa uno esterno ed uno interno.
L’interno finito misura in larghezza due volte il vostro e-reader più una volta lo spessore (11+11+1=23cm), mentre in altezza esattamente la stessa misura dell’e-reader (15cm). Prendete le misure ad aggiungete un margine per il risvolto, 1 cm per lato per semplicità. Nel mio caso 25cmx17cm
L’esterno, sempre il finito, misura in larghezza due volte la larghezza dell’e-reader più due volte lo spessore (11+11+1+1=24cm) mentre in altezza la misura dell’e-reader più due volte lo spessore (15+1+1=17cm). La cover non è proprio a filo dello schermo ma ‘sborda’ leggermente.
A questa misura dovremo andare ad aggiungere un margine per lo spessore dell’imbottitura più un secondo margine per il risvolto, 2 cm per lato dovrebbero andare bene. Nel mio caso avevo un rettangolo di 28cmx21cm
L’imbottitura ha la stessa dimensione dell’esterno cover finito (24cmx17cm)
Fissaggio
La mia cover è fissata semplicemente con tre pezzi di elastico, due negli angoli e uno lungo il lato dell’e-reader. Un’ultima banda elastica tiene chiusa la cover.
La lunghezza degli elastici dipende dallo spessore dell’e-reader. Fate delle prove e tagliateli a misura. Per gli angoli fate degli anelli di elastico cucendo tra loro gli estremi del pezzetto tagliato.

Creazione:
Molto semplicemente andremo a fissare i due rettangoli di stoffa l’uno sull’altro, inserendo tra i due strati l’imbottitura. Prima di cucire andremo a posizionare le bande elastiche in modo da fissare tutto con una sola cucitura.
- Prendete l’imbottitura, posizionatela al centro della stoffa esterna e richiudete i margini sull’imbottitura stessa lungo tutti e 4 i lati. Fissate con gli spilli o imbastite.
- Ripiegate ora i bordi della parte interna e stirateli in modo da avere il rettangolo interno finito.
- Posizionate gli anelli elastici sui due angoli esterni della cover e la fascia a circa 1cm dalla metà. Fissateli in posizione. Aggiungete ora l’ultima fascia elastica, a circa 1cm dal margine esterno della cover. Quest’ultima girerà all’esterno della cover stessa.
- Posizionate ora il rettangolo interno sull’esterno avendo cura di farlo passare tra le bande elastiche in modo da fissarle.
- Cucire tutto attorno al terragnolo interno prestando attenzione a non cucire la banda elastica esterna.
Molto più difficile a dirsi che a farsi!!

