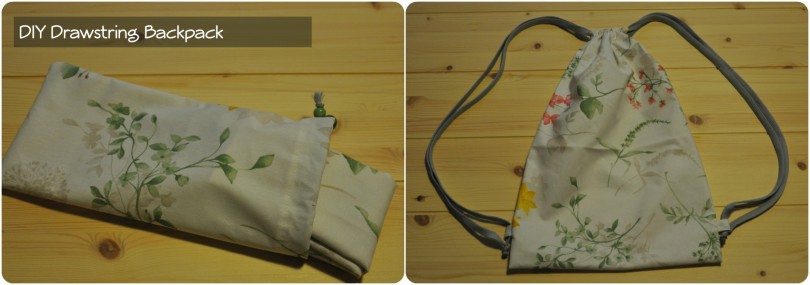
Another simple project, something like a 2.0 bye-bye bags; the super easy drawstring backpack.
To make it we will follow the same steps used fot the bags, add two eyelets and use a longer string to close. I hope you will love it like I do 🙂
+++ Trovate sotto la versione in italiano +++
For this project I used a waterproof fabric. It is a light, really strong, cotton treated with resin.
We will need: basic-sewing kit, fabric (50cm X 1mt), safe-pin, ribbon or string (4mt).
A) First of all we need to cut from the fabric:
– a rectangle of 1mt for 45cm.
– two squares of 5cm.
When cutting your rectangle pay attention to the direction of the decoration on the fabric. Consider to cut two pieces of 50cm instead of one of 1mt in order to have both sides of the back pack with a correct direction of the decoration.
B) We will now make the top part of the backpack, the folds used for the closing ribbon. So, working on the back side of the fabric, fold 5cm on both short edges, fix in place, reverse 0,5cm under the hem and sew.
 If you want you can sew a 0,5cm hem on the esternal side of the fold. This passage will be usefull especially on an easy fry fabric.
  C) Now, take the two 5cm squares, fold them in half, right side to right side, sew on the long edge and reverse. Fold them in half and leave aside, we will use them as eyelets.
D) Fold the fabric in half, pay attention to align the closing folds. Place the eyelets on the edges, remember to put them between the right sides of the fabric, and fix them in place. Make sure to have both at the same distance from the bottom of the backpack. Sew on the edges insisting on the eyelets. E) Reverse your backpack iside out and using a safe-pin insert the string trough the closing folds. You will need to cut your string in two, than strating from the right side of your backpack insert the string trough the first fold than turn back trough the second, insert the string trough the right eyetet and knot.
Do the same with the other string starting from left side. Done!
You can manage the lenght of the drawstring moving the knots.
If you want with the same fabric you can make a small bag and use it to put away your backpack ❤
+++ ITA Version +++
Nuovo progetto semplicissimo ma dalla grande soddisfazione. Partendo dalle nostre borse porta tutto ma aggiungendo due occhielli laterali ed allungando un po’ il cordino di chiusura possiamo andare a creare dei comodi zainetti.
Per questo progetto ho utilizzato del cotone trattato a resina, si tratta di una stoffa leggera, molto resistente e leggermente impermeabile.
Cosa ci serve: kit da cucito base, stoffa 50cm X 1mt, spilla da balia, cordone o stringa (4mt).
A) Iniziamo tagliando dalla nostra stoffa:
– un rettangolo di 1mt per 45cm.
– due quadrati di 5cm per lato.
Quando tagliate il rettangolo ricordate di considerare il verso della decorazione sulla stoffa, potreste aver bisogno di tagliare 2 pezzi da 50cm e giuntarli, anziché uno solo da 1mt, per evitare di avere uno del lati dello zaino con la stampa sottosopra.
B) Andiamo ora a creare i due risvolti per la chiusura dello zaino, esattamente come fatto per le borse. Lavoriamo sul retro della stoffa e pieghiamo verso l’interno 5cm di bordo, fissiamo in posizione risvoltando un margine di 0,5cm e cuciamo. Facciamo la stessa cosa sia sul lato superiore che su quello inferiore.Per finire meglio il risvolto potete andare a cucire un margine di 0,5cm sul lato esterno prima di ripiegare i 5cm. Questo passaggio risulterà ancora più utile se utilizzate una stoffa che ‘sfrangia’.C) Passiamo a lavorare sui due quadrati di 5cm, pieghiamoli a metà dritto su dritto e cuciamo il lato lungo. Risvoltiamo, pieghiamo a metà nel senso della lunghezza e lasciamo da parte.
D) Pieghiamo ora a metà la nostra stoffa verificando che i risvolti combacino. Fissiamo il lati del nostro zaino con gli spilli.
Andiamo a posizionare ora gli occhielli sui lati alla stessa distanza dal bordo inferiore del nostro zaino. Li fissiamo tra i due ‘dritti’ della stoffa, rivolti verso l’interno. Li posizioneremo a filo del bordo in modo tale da fissarli con la stessa cucitura con cui andremo a chiudere il lato dello zaino. Cuciamo ora i due lati, ripassando più volte sopra gli occhielli in modo da fissarli bene.  E)Rivoltiamo il nostri zaino, prendiamo la stringa, tagliamola a metà ed aiutandoci con una spilla da balia andiamo ad inserirla all’interno del risvolto. Partiamo da destra, inseriamo la stringa nel risvolto le facciamo fare tutto il giro della bocca del sacchetto e la facciamo uscire sempre sulla destra; la facciamo passare dentro l’occhiello e annodiamo le due estremità.
 Facciamo la stessa cosa dal lato sinistro. Fatto!
Potete aggiustare la lunghezza delle spalline variando la posizione dei nodi.
Se vi va con un ritaglio della stessa stoffa potete andare a creare una borsa dove riporre il vostro zaino.
